Tsawwassen Exterior House Painting Case Study
A real full exterior repaint we completed in Tsawwassen. This case study focuses on the front of the home, where our process and finished photos were taken, and walks through the stucco prep, the extensive exterior wood restoration, the new decorative trim, and the sprayed front door.
Get Your Free Quote → Call (604) 417-6483 ← Back to ProjectsThis page documents an actual Texora Painting & Drywall project completed in Tsawwassen, part of the City of Delta, BC. The scope was a full exterior repaint, but the process and finished photographs we have primarily document the front elevation, so that's what this case study focuses on: while accurately noting it was part of a larger exterior job.
The stucco exterior was pressure washed and prepared. The existing exterior wood needed substantially more work: deteriorated coating was removed, imperfections were repaired, sanded, sealed where appropriate and spot primed, and some areas needed extra primer because the exposed wood absorbed the first application quickly.
New decorative exterior trim was installed to achieve the homeowner's design vision. The exterior was finished in Sherwin-Williams SuperPaint Exterior Acrylic Latex, and the front door was spray painted using a Sherwin-Williams Emerald coating.
Project details
| Location | Tsawwassen, Delta, BC |
| Project | Full Exterior House Repainting |
| Featured Elevation | Front of Home |
| Main Surface | Stucco |
| Additional Surfaces | Exterior wood trim, door & architectural details |
| Main Coating | Sherwin-Williams SuperPaint Exterior Acrylic Latex |
| Door Coating | Sherwin-Williams Emerald |
| Application | Spray + appropriate detail work |
| Contractor | Texora Painting & Drywall |
Before: existing exterior condition
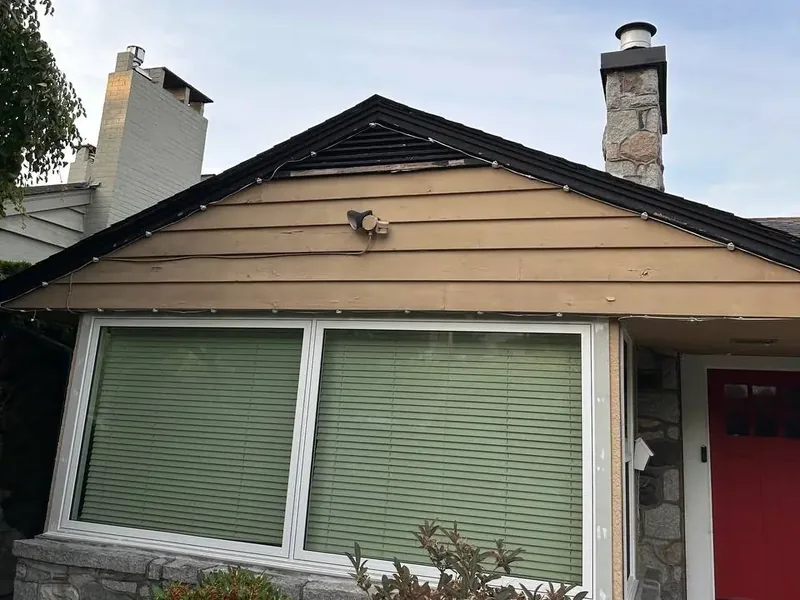
The before photo shows the front of the home in its original, faded state: tan-toned stucco and painted exterior wood that had lost its finish over the years. The stucco itself could be brought back with appropriate washing. The wood components were a different story: they needed substantially more preparation before they were ready for paint.
That distinction matters. Preparing sound stucco and preparing deteriorated exterior wood are not the same process, and a repaint that lasts depends on preparing each surface for its actual condition rather than treating the whole house the same way.
Pressure washing the stucco exterior
This stucco exterior was pressure washed before painting. We assessed the surface first and used a washing approach suited to this specific substrate and its condition: the goal was to remove surface dirt and contaminants and leave a clean base for the prep and coating that followed.
Aggressive pressure isn't safe for every stucco wall, so the method is matched to what's in front of us. After washing, the exterior was left to dry properly before any coating work began.
Protecting windows, glass, gutters and surrounding areas
Before spraying, glass was masked, and gutters and adjacent surfaces were protected as required. Where it produced cleaner access and a better finish, downspouts were temporarily removed rather than painted around.
A practical note on that: many residential downspouts are held by relatively simple fasteners, and taking one down where appropriate lets you prep and paint the wall behind it far more cleanly than working around it. If you try this yourself, photograph or mark the components first and return them to their original configuration afterward: and don't dismantle any drainage you're not confident you can reinstall correctly.
The wood preparation was the biggest part of the job
Exterior painting quality is decided largely by what happens before the finish coat. On this home the deteriorated painted wood drove a multi-stage prep process:
- Remove loose and failing coating
- Repair deeper imperfections
- Sand repaired and rough areas smooth
- Seal appropriate joints and repair areas
- Spot prime exposed bare wood
- Apply additional primer where the substrate stayed highly absorbent
- Re-secure loose wood where necessary
- Apply the finish coating
Faster paint removal using a wide oscillating multi-tool blade
One field technique our painters use when conditions allow: on certain areas of deteriorated exterior wood, instead of relying only on manual scraping, a wide blade on an oscillating multi-tool can be held at a shallow angle and carefully guided along failing coating to help lift it before sanding and further prep.
This is not universally appropriate. The wrong blade angle can gouge and damage sound wood; coating that's still bonded shouldn't simply be torn off; and the operator needs real control of the tool.
Dust and debris containment plus appropriate PPE are required, and older homes and coatings may call for lead-safe procedures before any existing paint is disturbed. Used in the right spots, it's an efficient way to get failing coating off; used carelessly, it does more harm than good.
Filling deeper wood defects
Deeper holes and gouges were filled with an exterior-capable wood filler, then sanded smooth once cured. Filler is for surface defects, not structural repair: if wood is severely rotten or no longer able to hold a repair, replacement is the right answer rather than filling it.
Sanding the repairs smooth
Repaired and rough areas were sanded to create smooth transitions before primer and paint. This isn't only cosmetic: good sanding removes the obvious ridges and abrupt steps between intact coating, filled repairs and exposed wood, so the finish reads as one continuous surface.
Sealing appropriate cracks and joints
Where needed, appropriate joints and cracks were sealed after prep. It helps to keep four different jobs straight, because they're often confused:
- Wood filler: fills appropriate surface defects in the wood
- Caulk / sealant: flexibly seals appropriate joints and gaps that move
- Primer: prepares and seals appropriate bare substrates for coating
- Finish coating: the final protective and decorative layer
Each has its place; none is a substitute for another. Caulk isn't required over every filled repair, and ordinary painter's caulk isn't waterproof structural protection.
Spot priming bare wood
Exposed bare wood was spot primed before the finish coats. Some particularly absorbent areas drank up the first application quickly and needed a second coat of primer: a finish coat can't make up for bare wood that wasn't properly sealed first.
Re-securing loose exterior wood
Certain loose, non-structural wood pieces were mechanically re-secured before filling and finishing, using 18-gauge finish/brad fastening where the small heads leave discreet, easily-filled repair points. An 18-gauge brad is not a structural fastener and this isn't what makes siding "last longer": it's simply a tidy way to stabilize loose trim before coating. Structural or badly deteriorated components need proper carpentry repair or replacement.
Installing new decorative exterior trim
The homeowner had a specific vision for the front elevation, and paint alone couldn't create the full architectural effect they wanted, so we installed additional decorative exterior trim, cut to fit the intended design. The material was pre-primed exterior trim suitable for the application, which meant the factory-primed faces didn't need the same bare-wood prep as raw lumber. Pre-primed isn't "zero prep," though: field-cut ends, exposed edges, any installation damage and the manufacturer's instructions all still have to be handled.
Using PL Premium MAX construction adhesive
The decorative trim was bonded where appropriate with LePage PL Premium MAX Construction Adhesive, an interior/exterior construction adhesive built for demanding bonding across common construction substrates, used per the manufacturer's instructions. (Retail pricing shifts over time, so we won't quote a figure here; the manufacturer/retailer listing has current details.)
Why we used Sherwin-Williams SuperPaint exterior
The main exterior coating was Sherwin-Williams SuperPaint Exterior Acrylic Latex. Sherwin-Williams describes it as using Advanced Resin Technology and formulates it for adhesion, hide, colour retention and exterior durability, and states it's dirt- and mildew-resistant and resists frost, peeling, blistering, fading and cracking.
It's a quality acrylic latex exterior paint: not a "rubber coating," not waterproofing, and not a permanent or maintenance-free finish. On the highlighted wood portions of this home, roughly three finish coats of SuperPaint were applied after the extensive prep and priming.
Extra coats aren't a default: they were warranted here by the substrate condition, the colour, coverage over repaired areas and the uniformity we wanted. Another project may need fewer.
Spray painting the stucco
On textured stucco, professional spray application works well when the surface is properly prepped and conditions are right: it gets coating evenly into the texture, keeps the film consistent, and moves efficiently across a complex surface. Masking becomes especially important, and technique has to suit the texture. Spraying isn't automatically the answer on every job: the method should follow the substrate, the coating spec and the conditions.
Painting the stone / masonry feature
An existing stone/masonry architectural feature on the front was also coated as part of this project: cleaned, allowed to dry appropriately, then coated with the selected exterior system. That's what we did on this home; it isn't a blanket recommendation to paint all stone. Natural stone, previously coated masonry and other substrates can need different coating systems and moisture considerations, so masonry is always assessed on its own terms.
Spray painting the front door
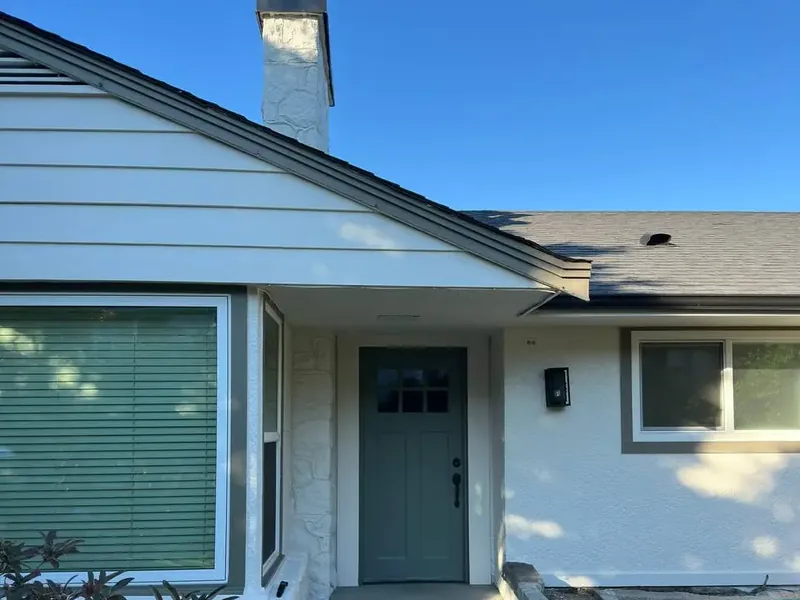
The front door was professionally spray painted using a Sherwin-Williams Emerald coating. Spraying was chosen for the smooth appearance and consistent film it gives a door: far less visible brush and roller texture, and clean detailing around the panels. The after photos show the finished door as the crisp focal point of the entry.
What actually goes into a professional exterior repaint?
Homeowners often ask what goes into exterior painting beyond "putting paint on the house." This project is a good answer: the visible finish is only the last step of a much longer sequence.
Assessment → washing → drying → scraping → repairs → sanding → sealing → priming → masking → carpentry / detail work → finish coating → reassembly → cleanup → final inspection. Skip or rush the early steps and the paint pays for it later: most of the durability is built before the finish coat ever goes on.
Exterior house painting in Tsawwassen, BC
This project was completed in Tsawwassen, part of the City of Delta, BC. We work on residential exterior projects throughout Tsawwassen and the surrounding Delta communities: areas like Beach Grove, Boundary Bay, Pebble Hill, English Bluff and Tsawwassen Springs, as well as nearby Ladner.
Living near the water means exterior wood condition, existing coating failure and proper drying before coating all deserve attention, and each substrate gets prepared for the shape it's actually in. Explore our exterior painting in Tsawwassen, exterior painting, full-home repaints and exterior wood & fascia repair, or see our garage door repaint in Tsawwassen. For the inside of the house, see interior house painting.
Homeowner takeaways from this Tsawwassen project
- Preparation can take far more effort than the painting itself.
- Stucco and wood require different preparation.
- Failing exterior wood coating should be addressed before repainting.
- Bare wood needs appropriate priming: sometimes more than one coat.
- Filling and caulking do different jobs.
- Loose wood may need re-fastening before coating.
- Decorative trim can reshape a facade without rebuilding it.
- Masking, and temporarily removing items like downspouts, produces cleaner results.
- Product selection matters for how the finish performs.
- The number of coats should follow the substrate and coverage, not an arbitrary rule.
Planning an exterior repaint in Tsawwassen?
If you're weighing an exterior repaint, stucco painting, trim restoration or a full-house repaint in Tsawwassen or Ladner, we're happy to take a look and provide an estimate.
- Phone: (604) 417-6483
- Email: info@texorapainting.com
- Web: Texora Painting & Drywall
Exterior house painting FAQ
How do you prepare a stucco house before painting?
On this project the stucco was assessed, then pressure washed with an approach suited to the surface to remove dirt and contaminants, and left to dry before coating. The right washing method depends on the stucco's condition: aggressive pressure isn't safe for every wall.
Can stucco be pressure washed before painting?
Often yes, when it's matched to the surface. The aim is a clean, sound substrate, followed by proper drying time before any paint goes on.
How do you prepare peeling exterior wood before repainting?
Remove the loose/failing coating, repair deeper defects with an exterior wood filler, sand smooth, seal appropriate joints, and spot prime bare wood, with extra primer where the wood is very absorbent. Badly rotted wood gets replaced instead of filled.
Should bare exterior wood be primed before painting?
Yes. Bare wood should be spot primed so the finish coats bond and last; on this home some absorbent areas needed a second primer coat before painting.