Tsawwassen Bathroom Drywall Repair
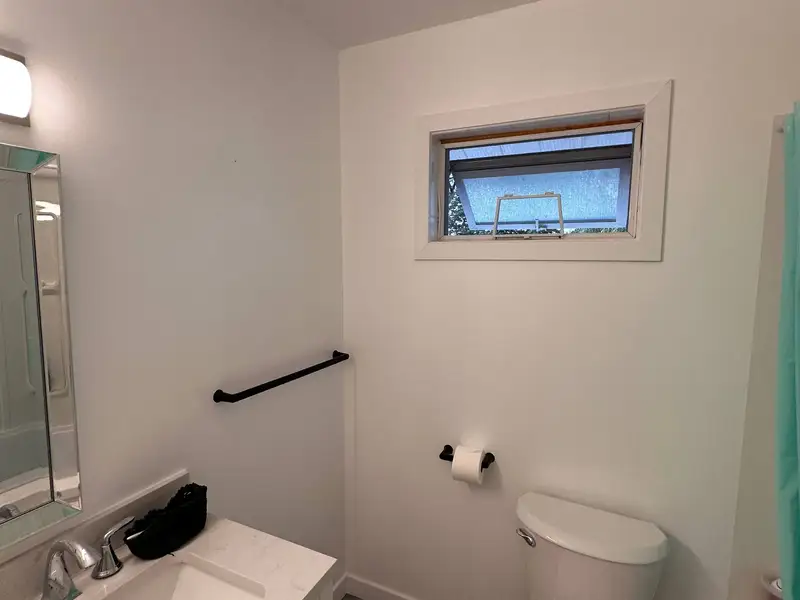
Water-damaged bathroom walls following a shower pan leak — moisture-resistant drywall installed, Level 4 finish, primed and painted to match in two days.
← Back to ProjectsBefore & After
Project Specs
| City | Tsawwassen, BC |
| Neighbourhood | Tsawwassen |
| Service Type | Drywall Repair |
| Duration | 2 days |
| Materials Used | USG Sheetrock moisture-resistant (green board) drywall, Durabond 90 setting compound, 3 coats all-purpose finish compound, mesh tape, PVA primer |
Scope of Work
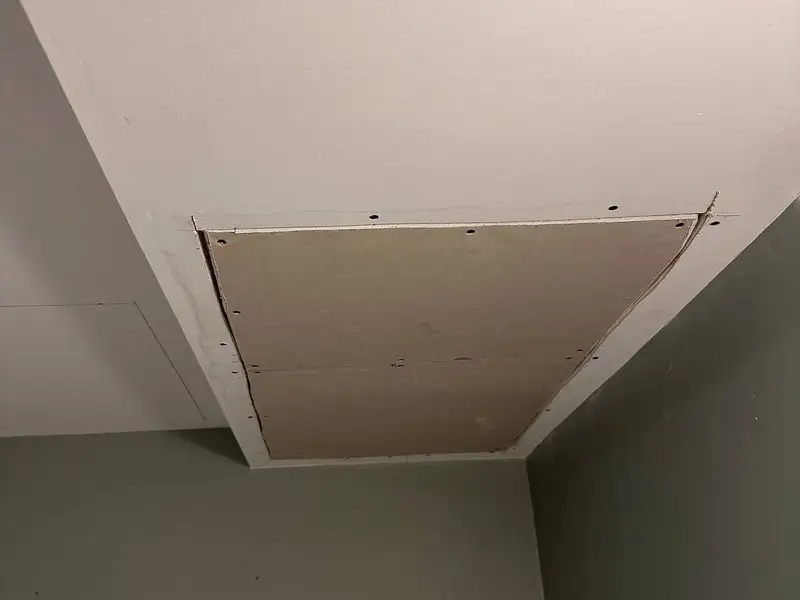
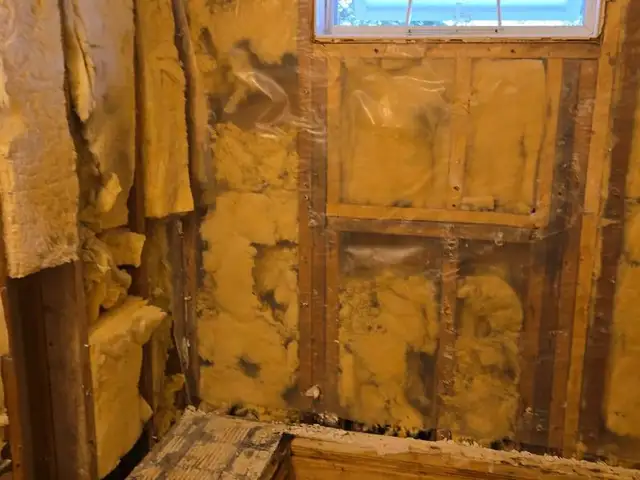
A slow shower pan leak had compromised the lower wall sections of this Tsawwassen bathroom. The water had wicked up through the drywall, causing the paper face to bubble, the core to crumble, and visible mould growth to begin at the base of the walls. The homeowners had already had a plumber address the leak — now they needed the walls restored properly before any risk of further mould spread.
This job required careful assessment first: we needed to identify exactly how far the moisture damage had spread, which meant removing a test section before cutting anything final. The scope of work included:
- Assessment of damage extent — cut test sections to verify moisture spread beyond visible damage
- Removal of all compromised drywall sections — cut back to nearest stud on each side for solid attachment points
- Inspection of wall cavity and framing for any moisture damage to studs (none found)
- Installation of USG Sheetrock moisture-resistant drywall (green board) in all repaired sections
- Taping all seams with mesh tape and Durabond 90 setting compound — fast-setting for a reliable first coat
- Three coats of all-purpose finish compound, with full sanding between each coat
- Level 4 finish achieved on all repaired surfaces
- PVA primer coat to seal the new drywall and equalize porosity
- Paint to match existing bathroom colour — two coats
We use moisture-resistant drywall (green board) as a minimum in all bathroom repairs — standard drywall has no place in wet areas. The result is walls that look as though they were never touched, and a substrate that will resist any future moisture exposure far better than what was originally installed.
Our Process
Damage Assessment
Test cuts made to determine the full extent of moisture damage. We never cut only to the visible damage line — moisture wicks further than what's visible. We confirmed the safe repair boundary, then marked cut lines at the nearest studs in each direction.
Damaged Drywall Removal
All compromised sections removed back to solid stud attachment points. Cavity inspected — studs were dry and structurally sound. Work area protected with plastic sheeting to contain any drywall dust.
Moisture-Resistant Drywall Installation
USG Sheetrock green board cut to fit and screwed to studs on 8-inch centres. Edges fitted tight to existing drywall. All fasteners countersunk slightly — dimpled but not breaking the paper face — ready for compound.
Tape & First Coat — Durabond 90
All seams taped with mesh tape. Durabond 90 setting compound worked into all seams and over fasteners. Setting compound is harder and more moisture-resistant than drying compound — the right choice for bathroom environments.
Second & Third Finish Coats
Two additional coats of all-purpose compound applied, feathering wider with each coat. Full sanding between each coat to remove any ridges or tool marks. Final coat left perfectly smooth before any priming.
Prime & Paint to Match
PVA primer applied to all new and repaired areas — this seals the porous compound and prevents the topcoat from flashing differently over repairs versus existing painted surfaces. Two coats of matching paint for an invisible repair.
"Quality work and service. Very nice and exceptional. Really recommended."
Our Work
See the Results
Live photos from our Google Business page — updated automatically as we add more projects.